When operating as a squad formations are a good way to ensure that
all squad/ team members are positioned in such as way as to provide both
optimum protection and the ability to retaliate if the squad comes under
fire. Essentially, formations are a way of preparing your squad for enemy
fire, saving you time in the organisation of your men following contact
with the enemy and ensuring minimum casualties in the event that the squad
is attacked. There are a number of different formations which will be used
in different circumstances, depending on terrain, direction of travel,
likely direction of enemy fire and overall risk of enemy contact.
A note about spacing: Regardless of what formation the squad is operating
in at any given time, one overarching principle to remember is that of
spacing. Every member of the squad/ team should be maintaining a reasonable
safe distance between him and his comrades on either side of him. This limits
the lethal consequences of a suprise attack from either small arms or
explosives such as IED's, mortar/ artillery strikes and grenades. If 3 men
are stood within 2 meters of each other and a grenade lands amongst them, all
3 will likely be killed. If the same 3 men are stood 20m apart and a grenade
lands near them, it is likely only 1 man will be killed/ wounded. Therefore is
is vital to constantly maintain safe spacing between men, both during travel
and when stopped. Spacing may be adapted according to local conditions or the
leader's orders, for example in tight jungle spacing may have to be reduced
to as little as 10m to maintain visual contact with one another, however in
flat open desert spacing may be increased to as much as 100m. The general
rule is that spacing should be kept as wide as possible, whilst still
allowing both visual contact and communication to be maintained by every
member of the element.
Hold Formation[]
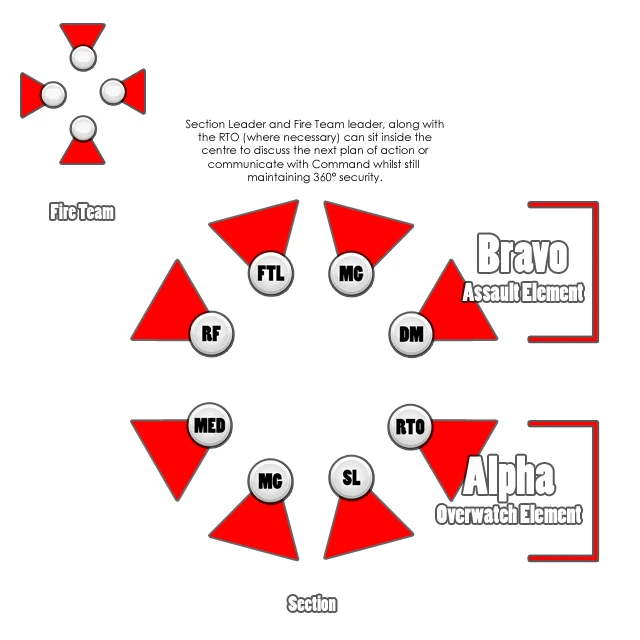
The hold formation is not a formation for when the squad is moving, it is instead a formation that should be assumed primarily whenever the element is stationary for over a minute or when the group plans to be stationary for several minutes or longer, for example if awaiting orders or protecting a landing zone. The formation essentially consists of all squad members arranged in a loose hollow circle or ring, with every man looking outwards. The circle should cover the full 360 degrees around the squad, with every angle being observed. This is a defensive formation with every man looking outwards, providing maximum observation all the way around the squad's position. This means that it will be very difficult for any enemy units to approach undetected from any angle. Whilst in the hold formation at least one squad member will also always be able to engage at any given angle, meaning that no matter what direction the enemy may approach from they will always be able to be engaged.
This 360 degree observation and fire capability means that this formation offers maximum security
for the squad, making this the perfect formation for defending a specific area or item such as a
disabled vehicle or a crossroad. The formation is also useful for protecting individuals, such as
VIPs or inured squad members who are undergoing treatment by the medic. The perimeter can be formed
around these individuals with them in the center, providing them with 360 degree cover and protection.
It is important for all infantry soldiers to get into the habit of naturally assuming a hold formation
when the squad is not moving or at times when the squad is vulnerable to attack, e.g. just after
disembarking from a helicopter, without having to be explicitly ordered to by the element leader.
This means that the squad will naturally be as safe as possible, greatly reducing the likelihood of
the enemy being able to sneak up on the squad from an unobserved angle.
Players must also get into the habit of observing where their team-mates are covering in the perimeter
and identifying angles which are not being covered. If you notice a gap in the perimeter whilst several
of your squad are all covering the same angle, alert them to this vulnerable area or simply take
responsibility for covering that area yourself. It may be helpful for each squad member to call out which angle they are covering in terms of the major compass directions (N, NE, E, SE, S, SW, W, NW).
Advantages and Disadvantages[]
Advantages
-Excellent all round observation and cover. This subsequently means that the formation offers good
security for the squad, increasing the likelihood of identifying and successfully engaging the enemy
no matter where they approach from.
-Perfect for protection duties. The fact that this formation gives such good security makes it ideal
for the protection of important areas, persons or other items such as vehicles, with the perimeter
being formed around the object that requires protection.
Disadvantages
-Very difficult to maintain whilst moving. The hold formation requires all squad members to be facing
outwards and away from one another, as well everyone being faced in different directions. This means
that moving whilst maintaining this formation is near on impossible, there are no visual references
as to the position, pace, direction etc of the rest of the squad and in order to maintain the correct
facing certain squad members would have to walk backwards or sideways. This is why the hold formation
is used whilst the squad is stationary.
-Can be difficult with fewer squad members. If your element's number are limited this means that each
individual member will have to cover a wider sector. This can produce difficulties in effectively
observing and covering each sector, particular if the group's numbers are less than 4, with greater
strain being placed on each squad member and also reducing the amount of fire that can be put down in
any given direction.